We have used sudo command to get the ‘temporary’ root access for various commands previously. Alongside that, we also used su to login as root user for our Linux VM.
But before all this, If you were following the Steps to install Linux Debian VM on UTM, you would have noticed that we added our default user as a root user.
Let’s understand how this all works.
Sudo Command
Sudo stands for super-user do. The basic philosophy is to give as few privileges as possible.1
When someone has to execute some kind of command which usually requires root privilege, the user needs to either login as root user or some other user with the privilege to execute root commands and how do we do that? yes, you guessed it right, by adding that specific user to sudoers file.
We did the same thing while installing our system. Goto Step 25-31 for a refresher
Imagine sudoers file as a ‘record’ to store the information about who can perform what and at what level.
Every single linux system out there has a root user with a fresh install. default user is dependent on the distro that we are using. We chose debian, for which it is not strictly required to do that; but we still did it because it is the safe thing to do.
Here's why
While we are at this, there’s a really important nuance that you guys should know about.
Some popular distros like Ubuntu lock direct root login by default. Instead, they expect users to temporarily escalate privileges using sudo. This is intentional to prevent beginners to accidentally nuke their OS 😭
In our case, if we go back in time when were setting up our VM. You might have noticed, that we were initializing our default user for the VM ie: jumpbox and adding it to the sudoers group. This was because, we needed to execute sudo commands while installing dependencies for this lab, remember installing wget, curl, git..?
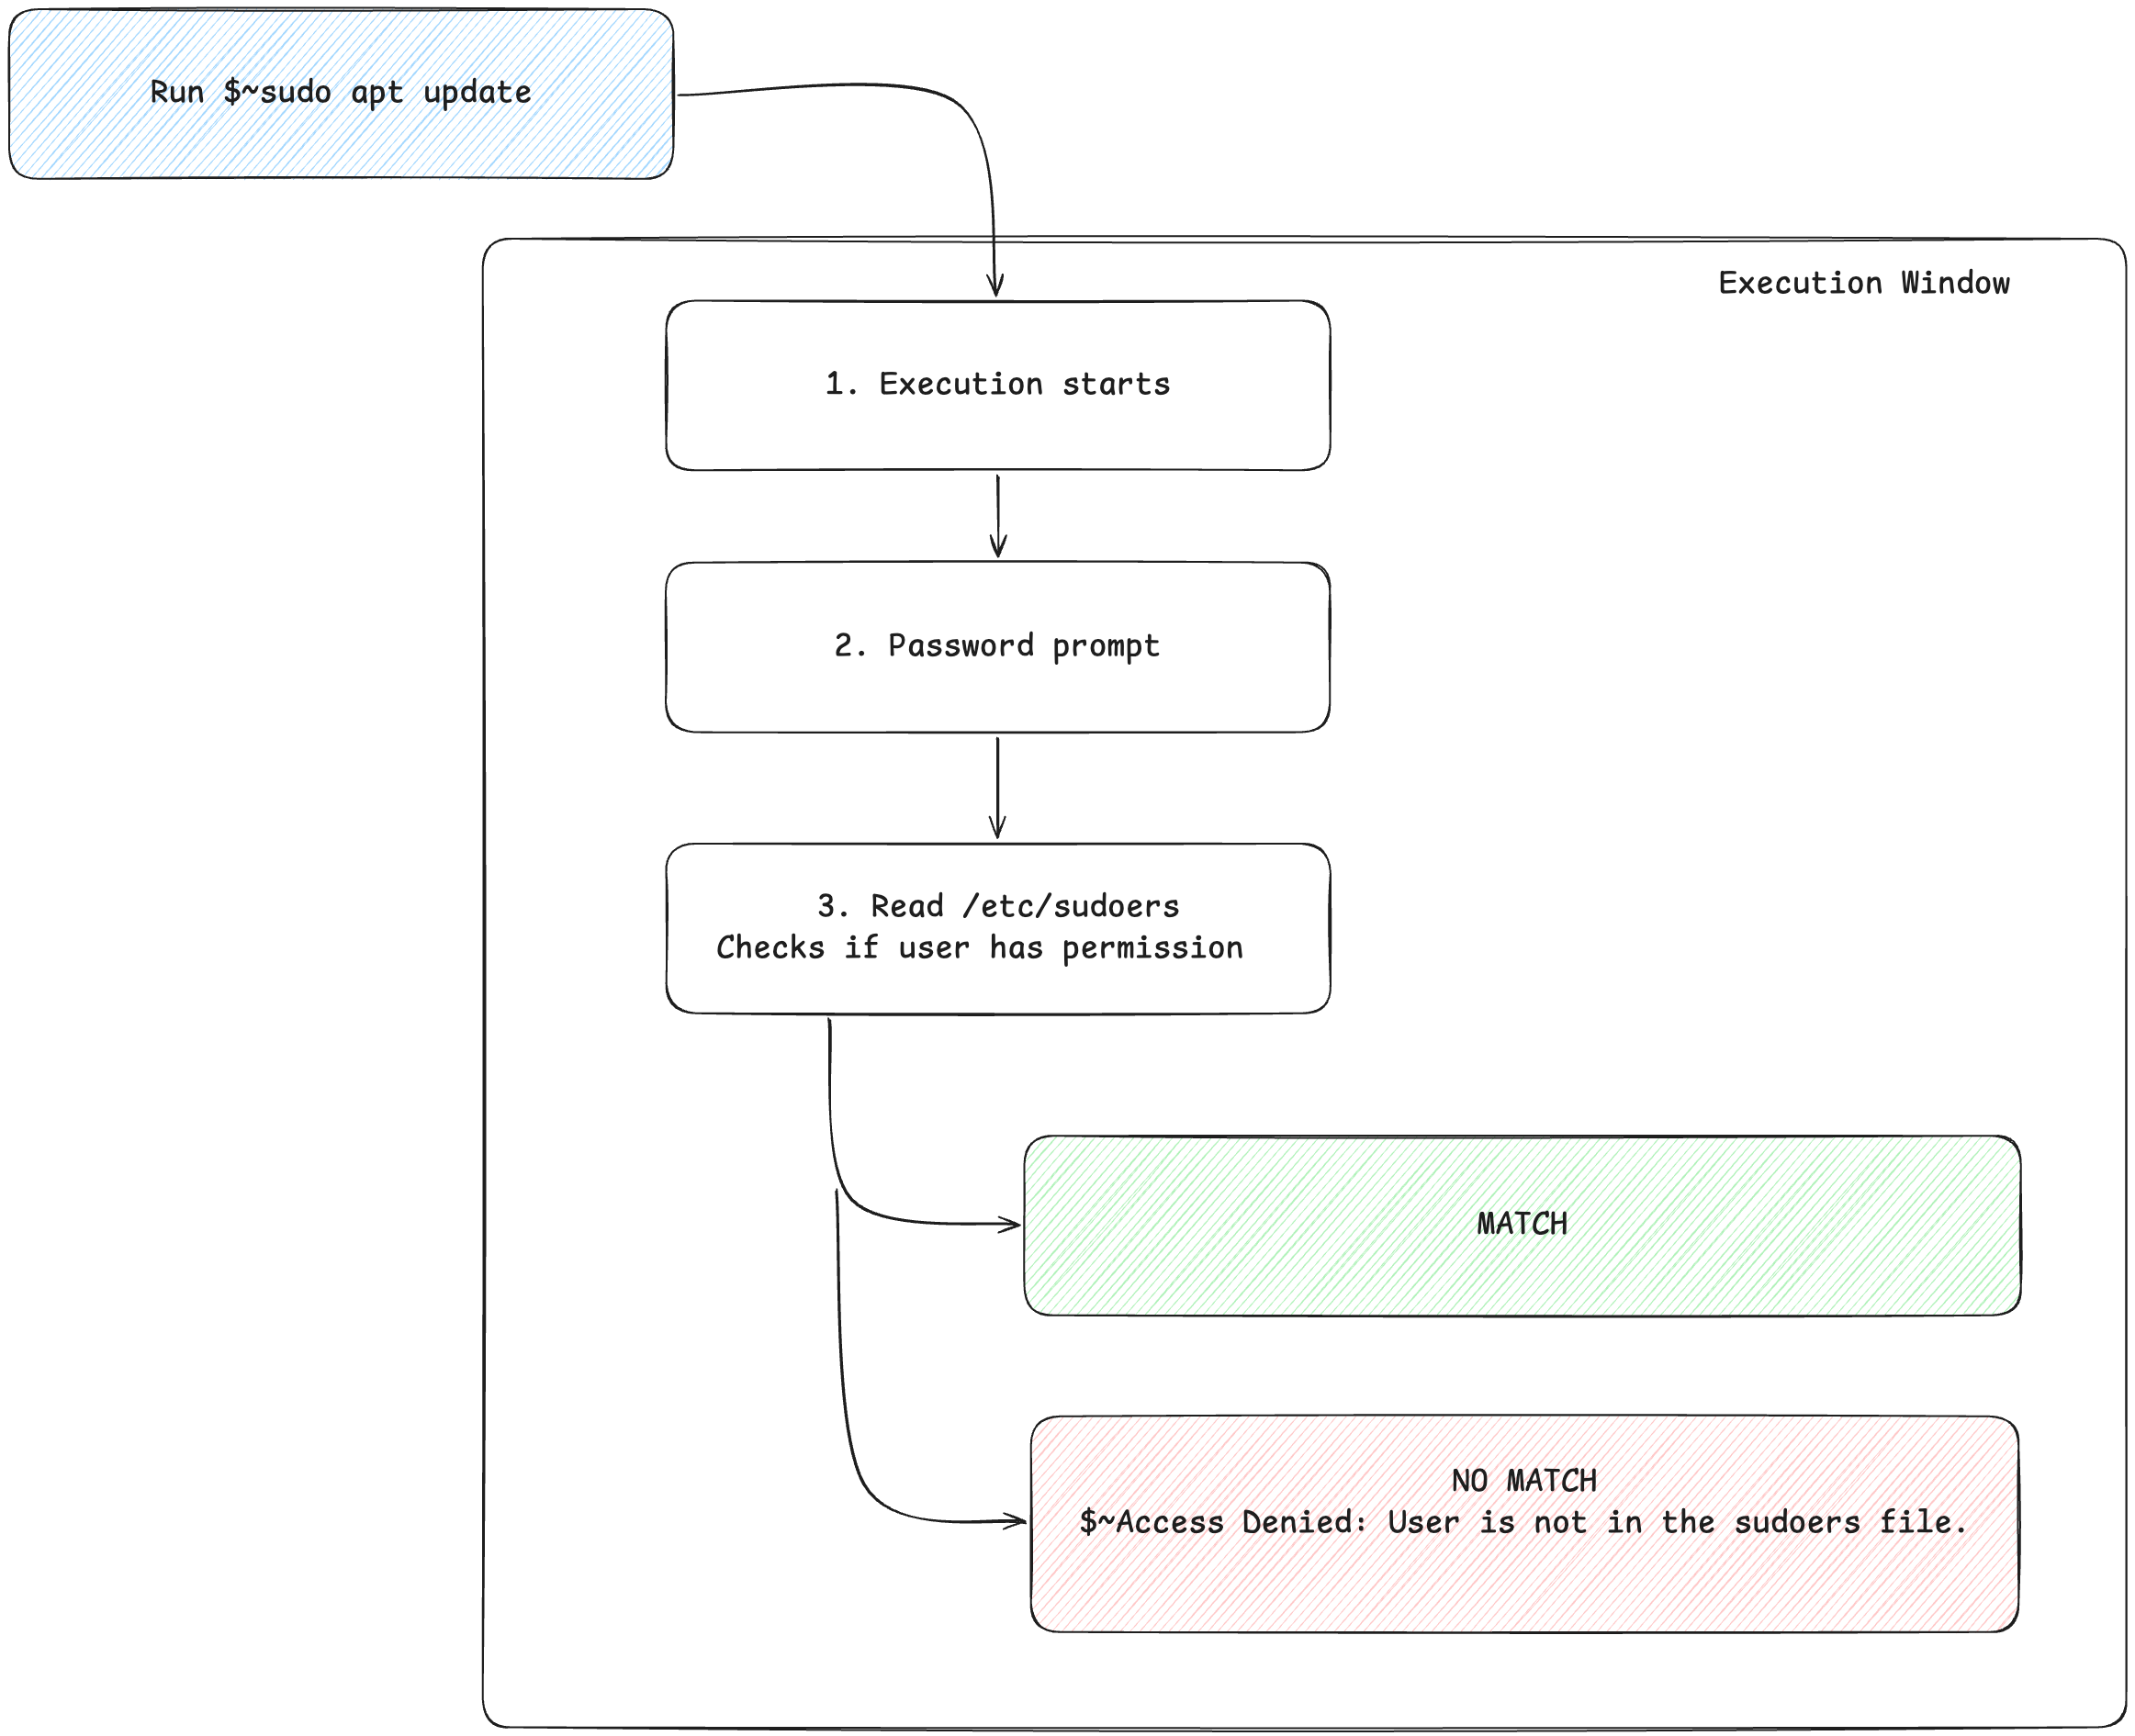
What if we execute sudo command from a user who is not in sudoers file?
Well, As you might expect. It will fail. I did note it previously in the installation as well.
More specifically, it will result in Access Denied: User is not in the sudoers file.
And it makes sense, as if the user is not registered to execute root commands why should it be able to do that in the first place.
For the sake of simplicity, we went ahead and ‘elevated’ the default user as root user.
This is exactly what the execution looks like
Missed detail: When an unauthorized user attempts a sudo command, the failure is actively caught and logged to /var/log/auth.log or /var/log/secure.
Su Command
In short, su is just a linux command that is used to switch our current shell session to another user like default, root, etc.
You can use this command to switch to root user like this:
su -# different approach# `su root` or `su` (functionally same)
Difference between su and su -
The difference is just the hyphen. The only real functional difference is the working environment.2
su(or just su root): Leaves us in the current working directory (eg. /home/user)
su - (or su - root): Completely resets the terminal. It moves you straight to the /root home directory and loads root’s official system path variables (like /sbin), ensuring all administrative commands work perfectly.
Now, let’s talk about another way to execute root commands and that is through the root user itself.
As discussed in the previous section, we could use either of those command to get into root user for that machine.
What we did in Debian Linux VM Installation
In our UTM Debian installation, we left the root password completely blank during setup.
This indirectly bypassed the default automatic group assignment during our minimal configuration, our jumpbox ‘default’ user was left unprivileged on purpose.
This is exactly why running sudo whoami initially failed, forcing us to use su to manually run usermod -aG sudo and elevate our access to root level.
The key indication from which we can find out if we are logged in as root user for that distro is prompt changing from:
username@hostname:~$
to :
root@hostname:~#
Now, In a typical Kubernetes cluster, every single command is executed from jumpbox, which means we have to further SSH into server and node-0 and node-1 from jumpbox.
Don’t you think it is a bit cumbersome? Imagine SSH’ing into jumpbox@jumpbox:~$ then jump to root@jumpbox:~#, then SSH’ing into server@server:~$ then, let’s say you have to change something in server, you have to again to into root.
At this very point, it makes a lot more sense to have a direct way to login as root user to avoid these verbose steps.
Enable Root Access over SSH
SSH will be used to configure the machines in the cluster. Verify that you have root SSH access to each machine listed in your machine database. You may need to enable root SSH access on each node by updating the sshd_config file and restarting the SSH server.3
This is different from what we did before. Earlier, we gave ‘default’ user access toroot commands.
Now, we will configure the jumpbox to SSH directly as root user for server, node-0, node-1
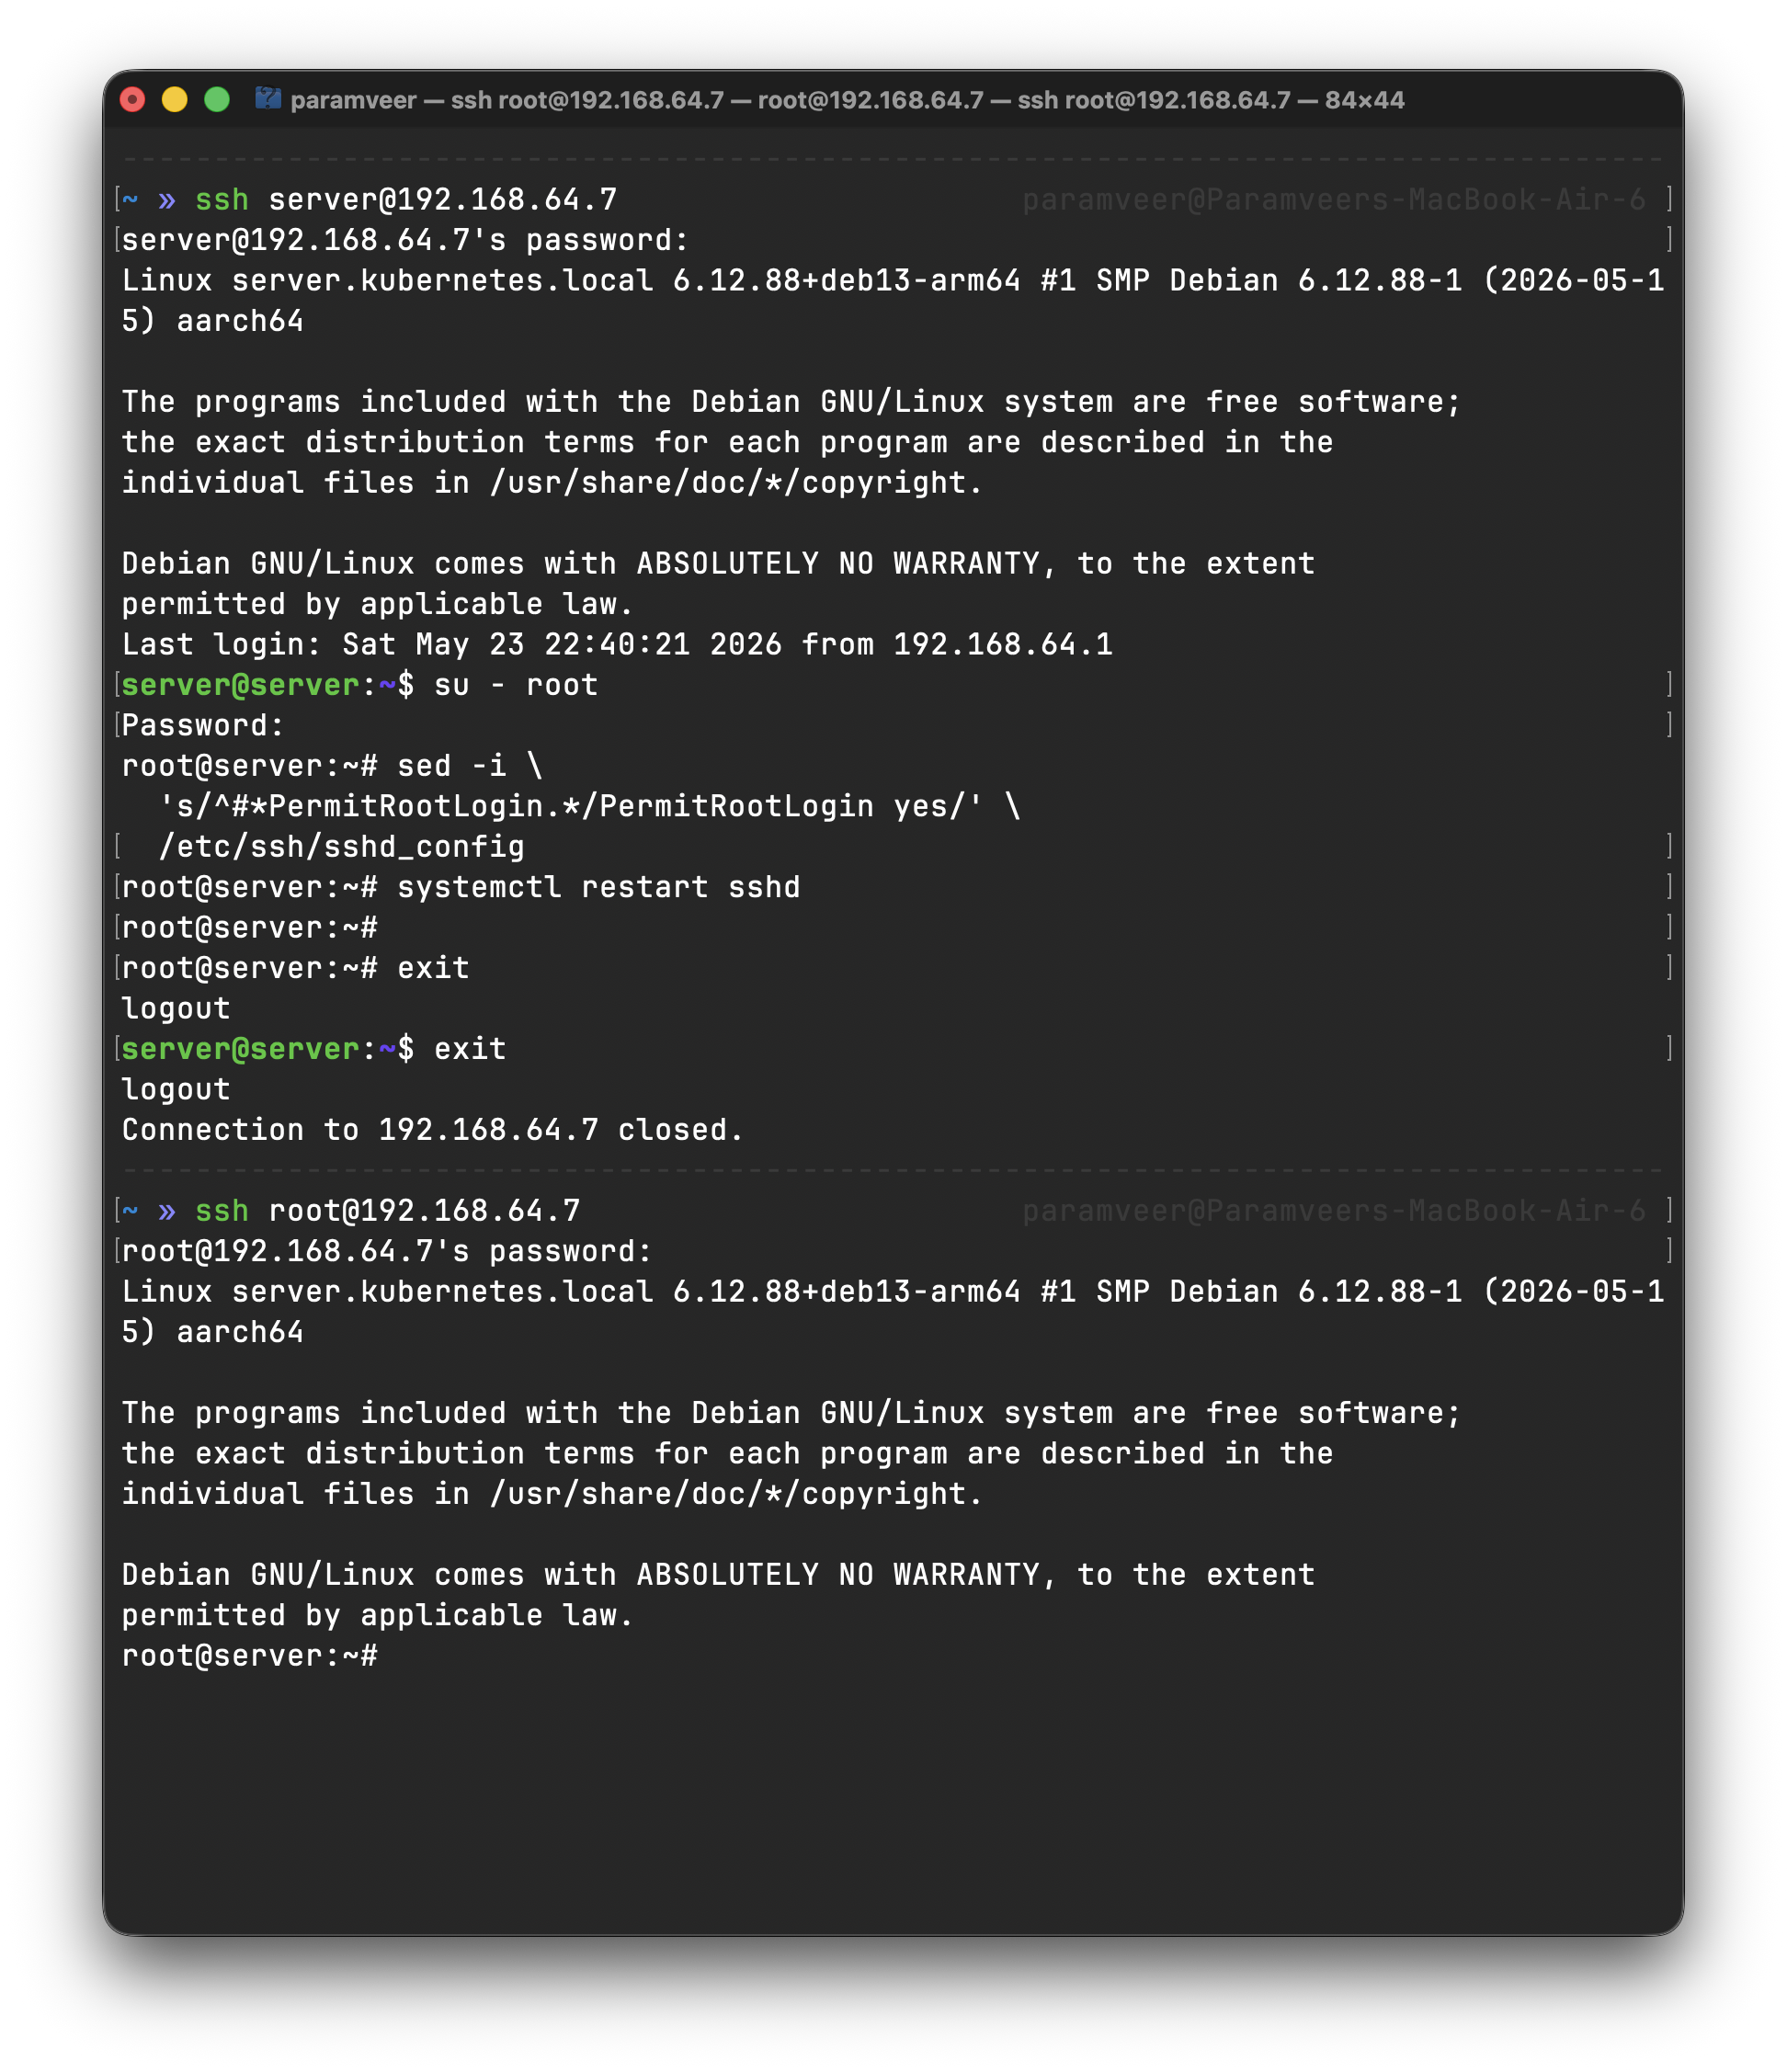
By default, a new debian install disables SSH access for the root user. This is done for security reasons as the root user has total administrative control of unix-like systems. If a weak password is used on a machine connected to the internet, well, let’s just say it’s only a matter of time before your machine belongs to someone else. As mentioned earlier, we are going to enable root access over SSH in order to streamline the steps in this tutorial. Security is a tradeoff, and in this case, we are optimizing for convenience. Log on to each machine via SSH using your user account, then switch to the root user using the su command:3
su - root
Edit the /etc/ssh/sshd_config SSH daemon configuration file and set the PermitRootLogin option to yes:
sed -i \
  's/^#*PermitRootLogin.*/PermitRootLogin yes/' \
  /etc/ssh/sshd_config
Restart the sshd SSH server to pick up the updated configuration file:
systemctl restart sshd
We could verify the same using these steps:
Run exit to leave root access
Run exit again to exit SSH session
Run ssh root@ip-address
voila!
Notice now we don’t encounter any error whilst trying to get in as root error directly.
Permission denied, please try again.
If you would have tried the same without these steps you would encounter
If you did everything correctly here, this is how the output should look like
Repeat all these steps for node-0 and node-1
INFO
We don’t need to do this for jumpbox as it is a bad practice to access root over SSH
By now, we can access root user over SSH for every machine from our Kubernetes cluster, see here.
SSH Keygen
In this section you will generate and distribute an SSH keypair to the server, node-0, and node-1, machines, which will be used to run commands on those machines throughout this tutorial. Run the following commands from the jumpbox machine.3
Make sure you are in root mode in jumpbox machine. Something like this
Your cmd line should look like this root@jumpbox:~/kubernetes-the-hard-way#
Now we need to generate SSH Keys for our jumpbox VM and distribute to every single machine present in our cluster.
But why?
For this, we first need to understand what a ssh-keygen is. To know more about this, you can visit en.wikipedia.org/wiki/Ssh-keygen or you could stick by for this very basic explanation
ssh-keygen allows us to generate a cryptographic authentication key, which essentially means that its really safe. We have used RSA algorithm, you can see the same in your terminal log.
Imagine this key to have a fingerprint of our machine. Now, if we place this fingerprint to the machine we want to access. That machine essentially knows that its safe to let us in. So, the need for re-entering password is eliminated
Generate and Distribute SSH Keys
Generate SSH Keygen
ssh keygen
Copy the SSH public key to each machine
while read IP FQDN HOST SUBNET; do
ssh-copy-id root@${IP}
done < machines.txt
Once each key is added, verify SSH public key access is working
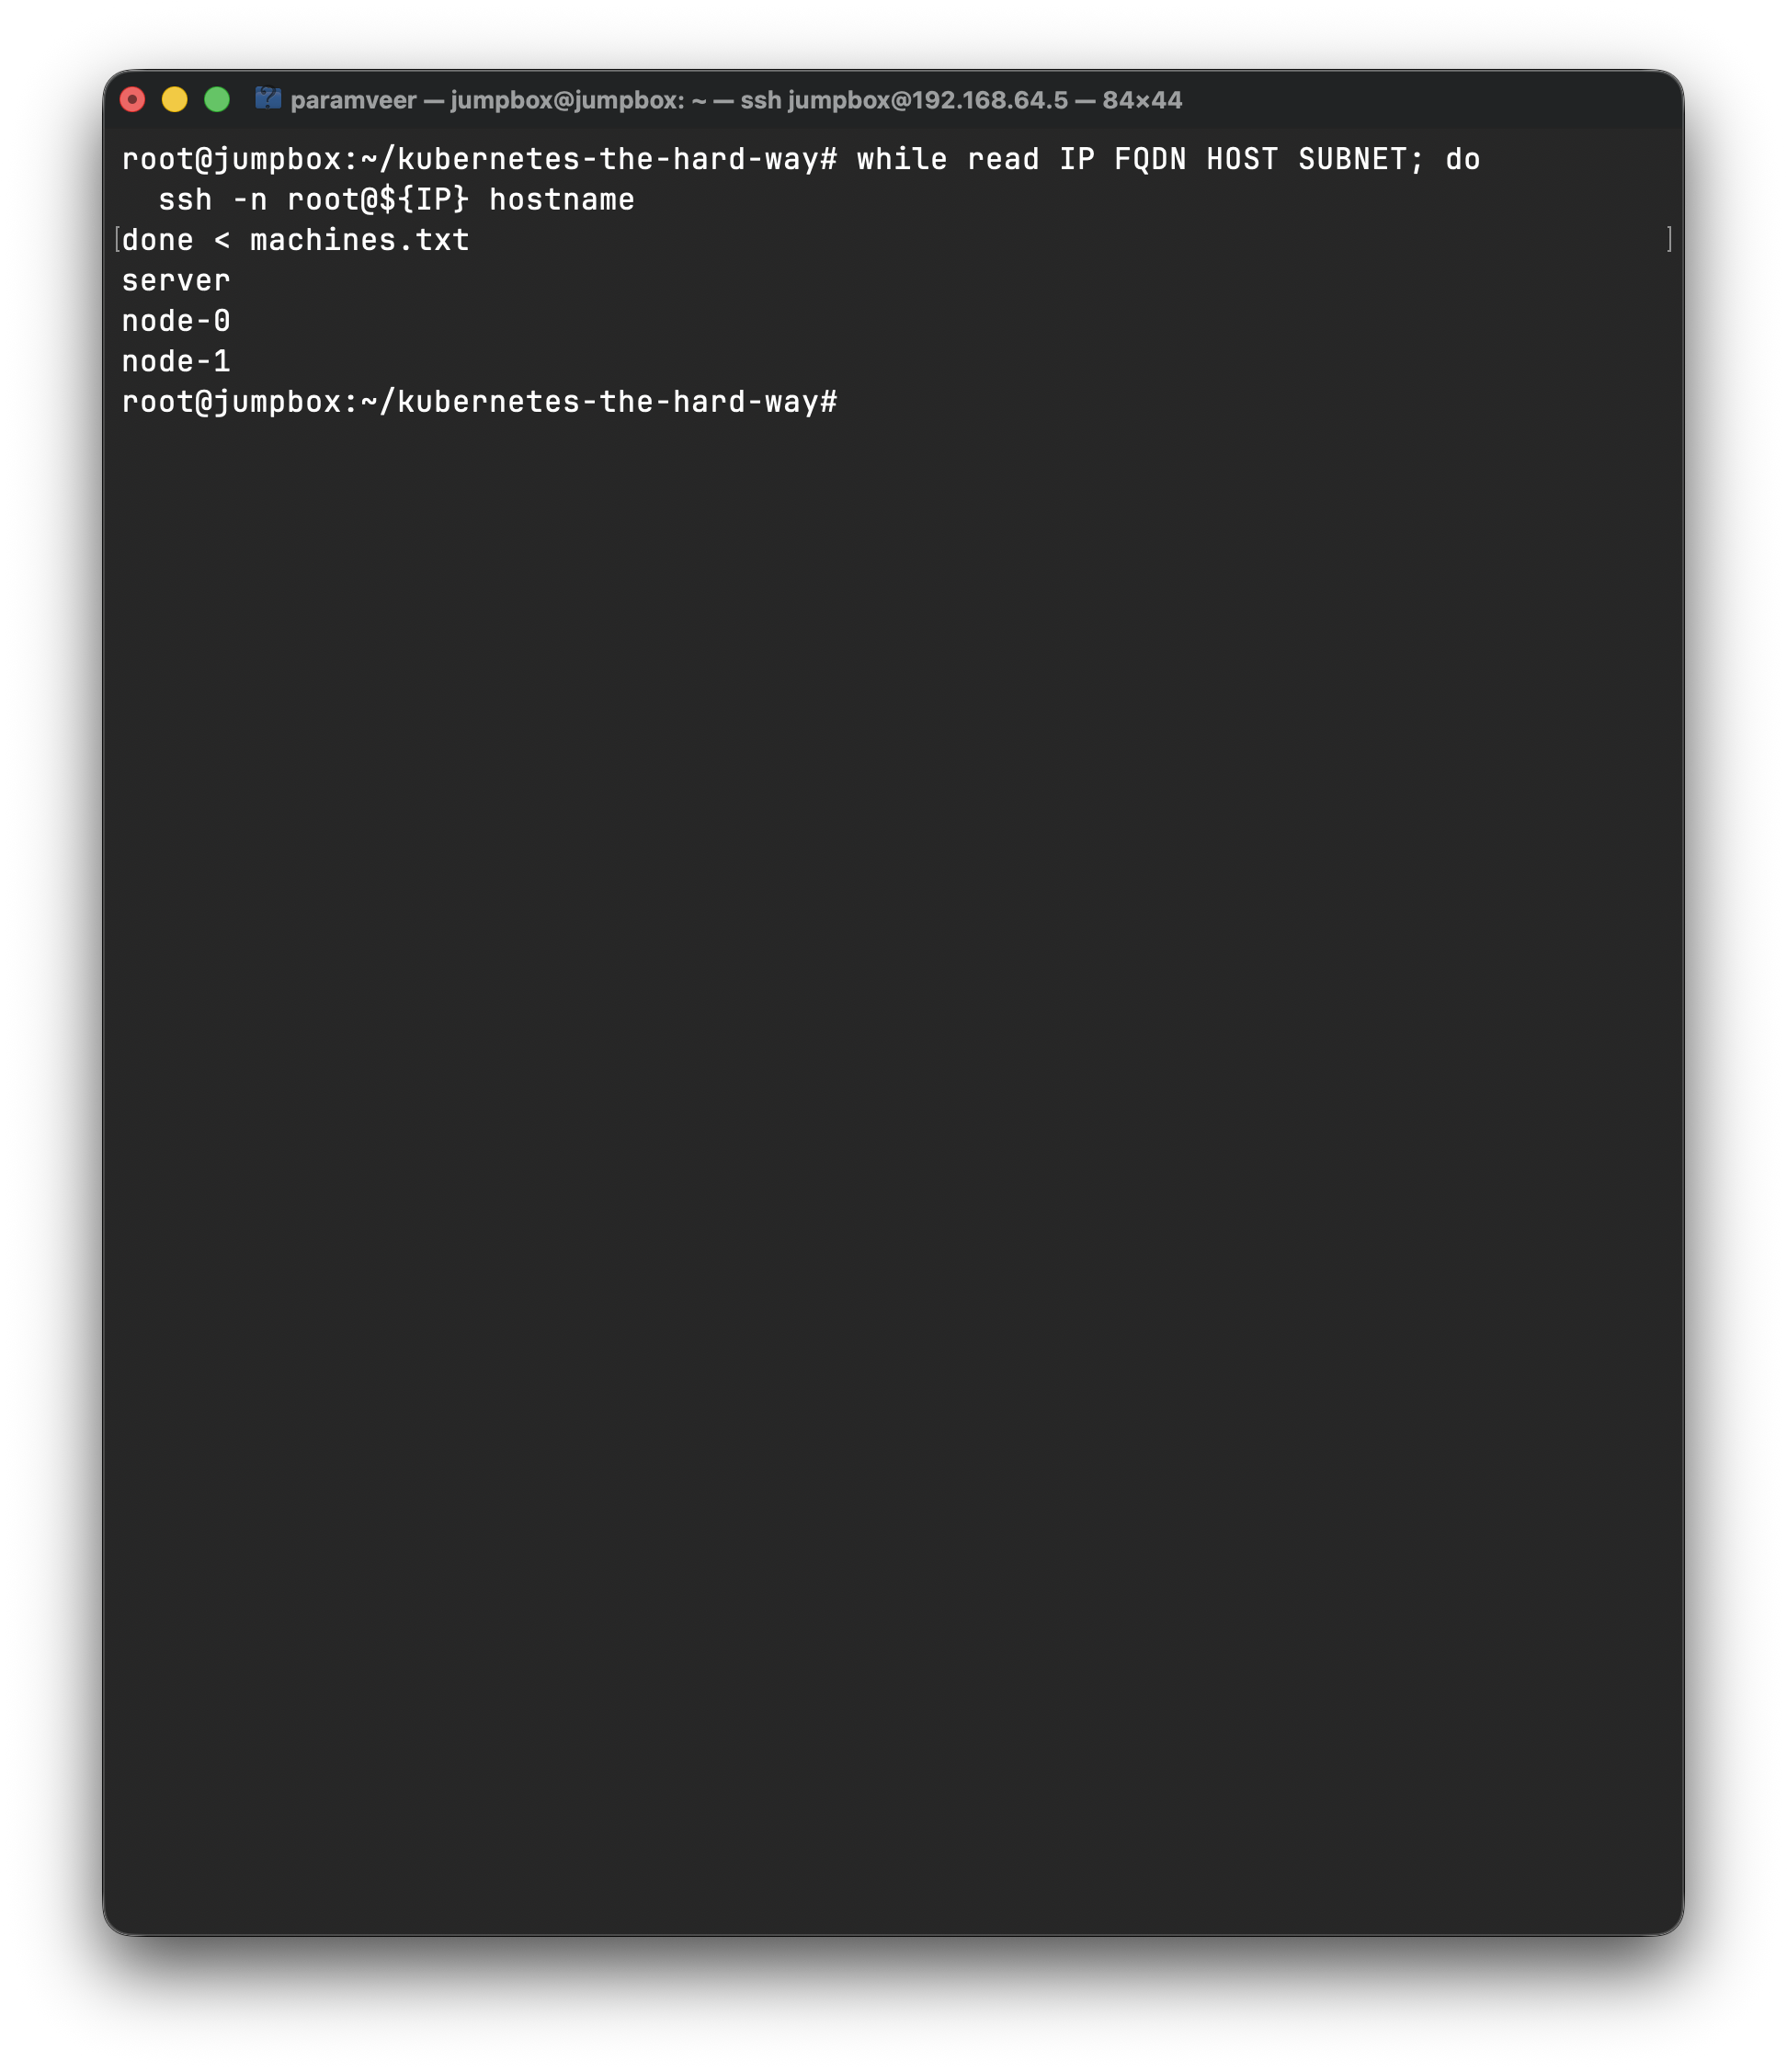
while read IP FQDN HOST SUBNET; dossh -n root@${IP} hostnamedone < machines.txt
The output should look like this:
TLDR; This means now, if we to SSH from jumpbox to server, node-0 or node-1, we do not require to enter password again and again for each VM, making our life much easier.
You can verify the same using this command from jumpbox:
ssh root@ip-address
This should not prompt you for password for that machine
Hostnames
In this section you will assign hostnames to the server, node-0, and node-1 machines. The hostname will be used when executing commands from the jumpbox to each machine. The hostname also plays a major role within the cluster. Instead of Kubernetes clients using an IP address to issue commands to the Kubernetes API server, those clients will use the server hostname instead. Hostnames are also used by each worker machine, node-0 and node-1 when registering with a given Kubernetes cluster.3
If you were following, we do not need to cover this step, as we did this manually earlier.
You can verify this by this command
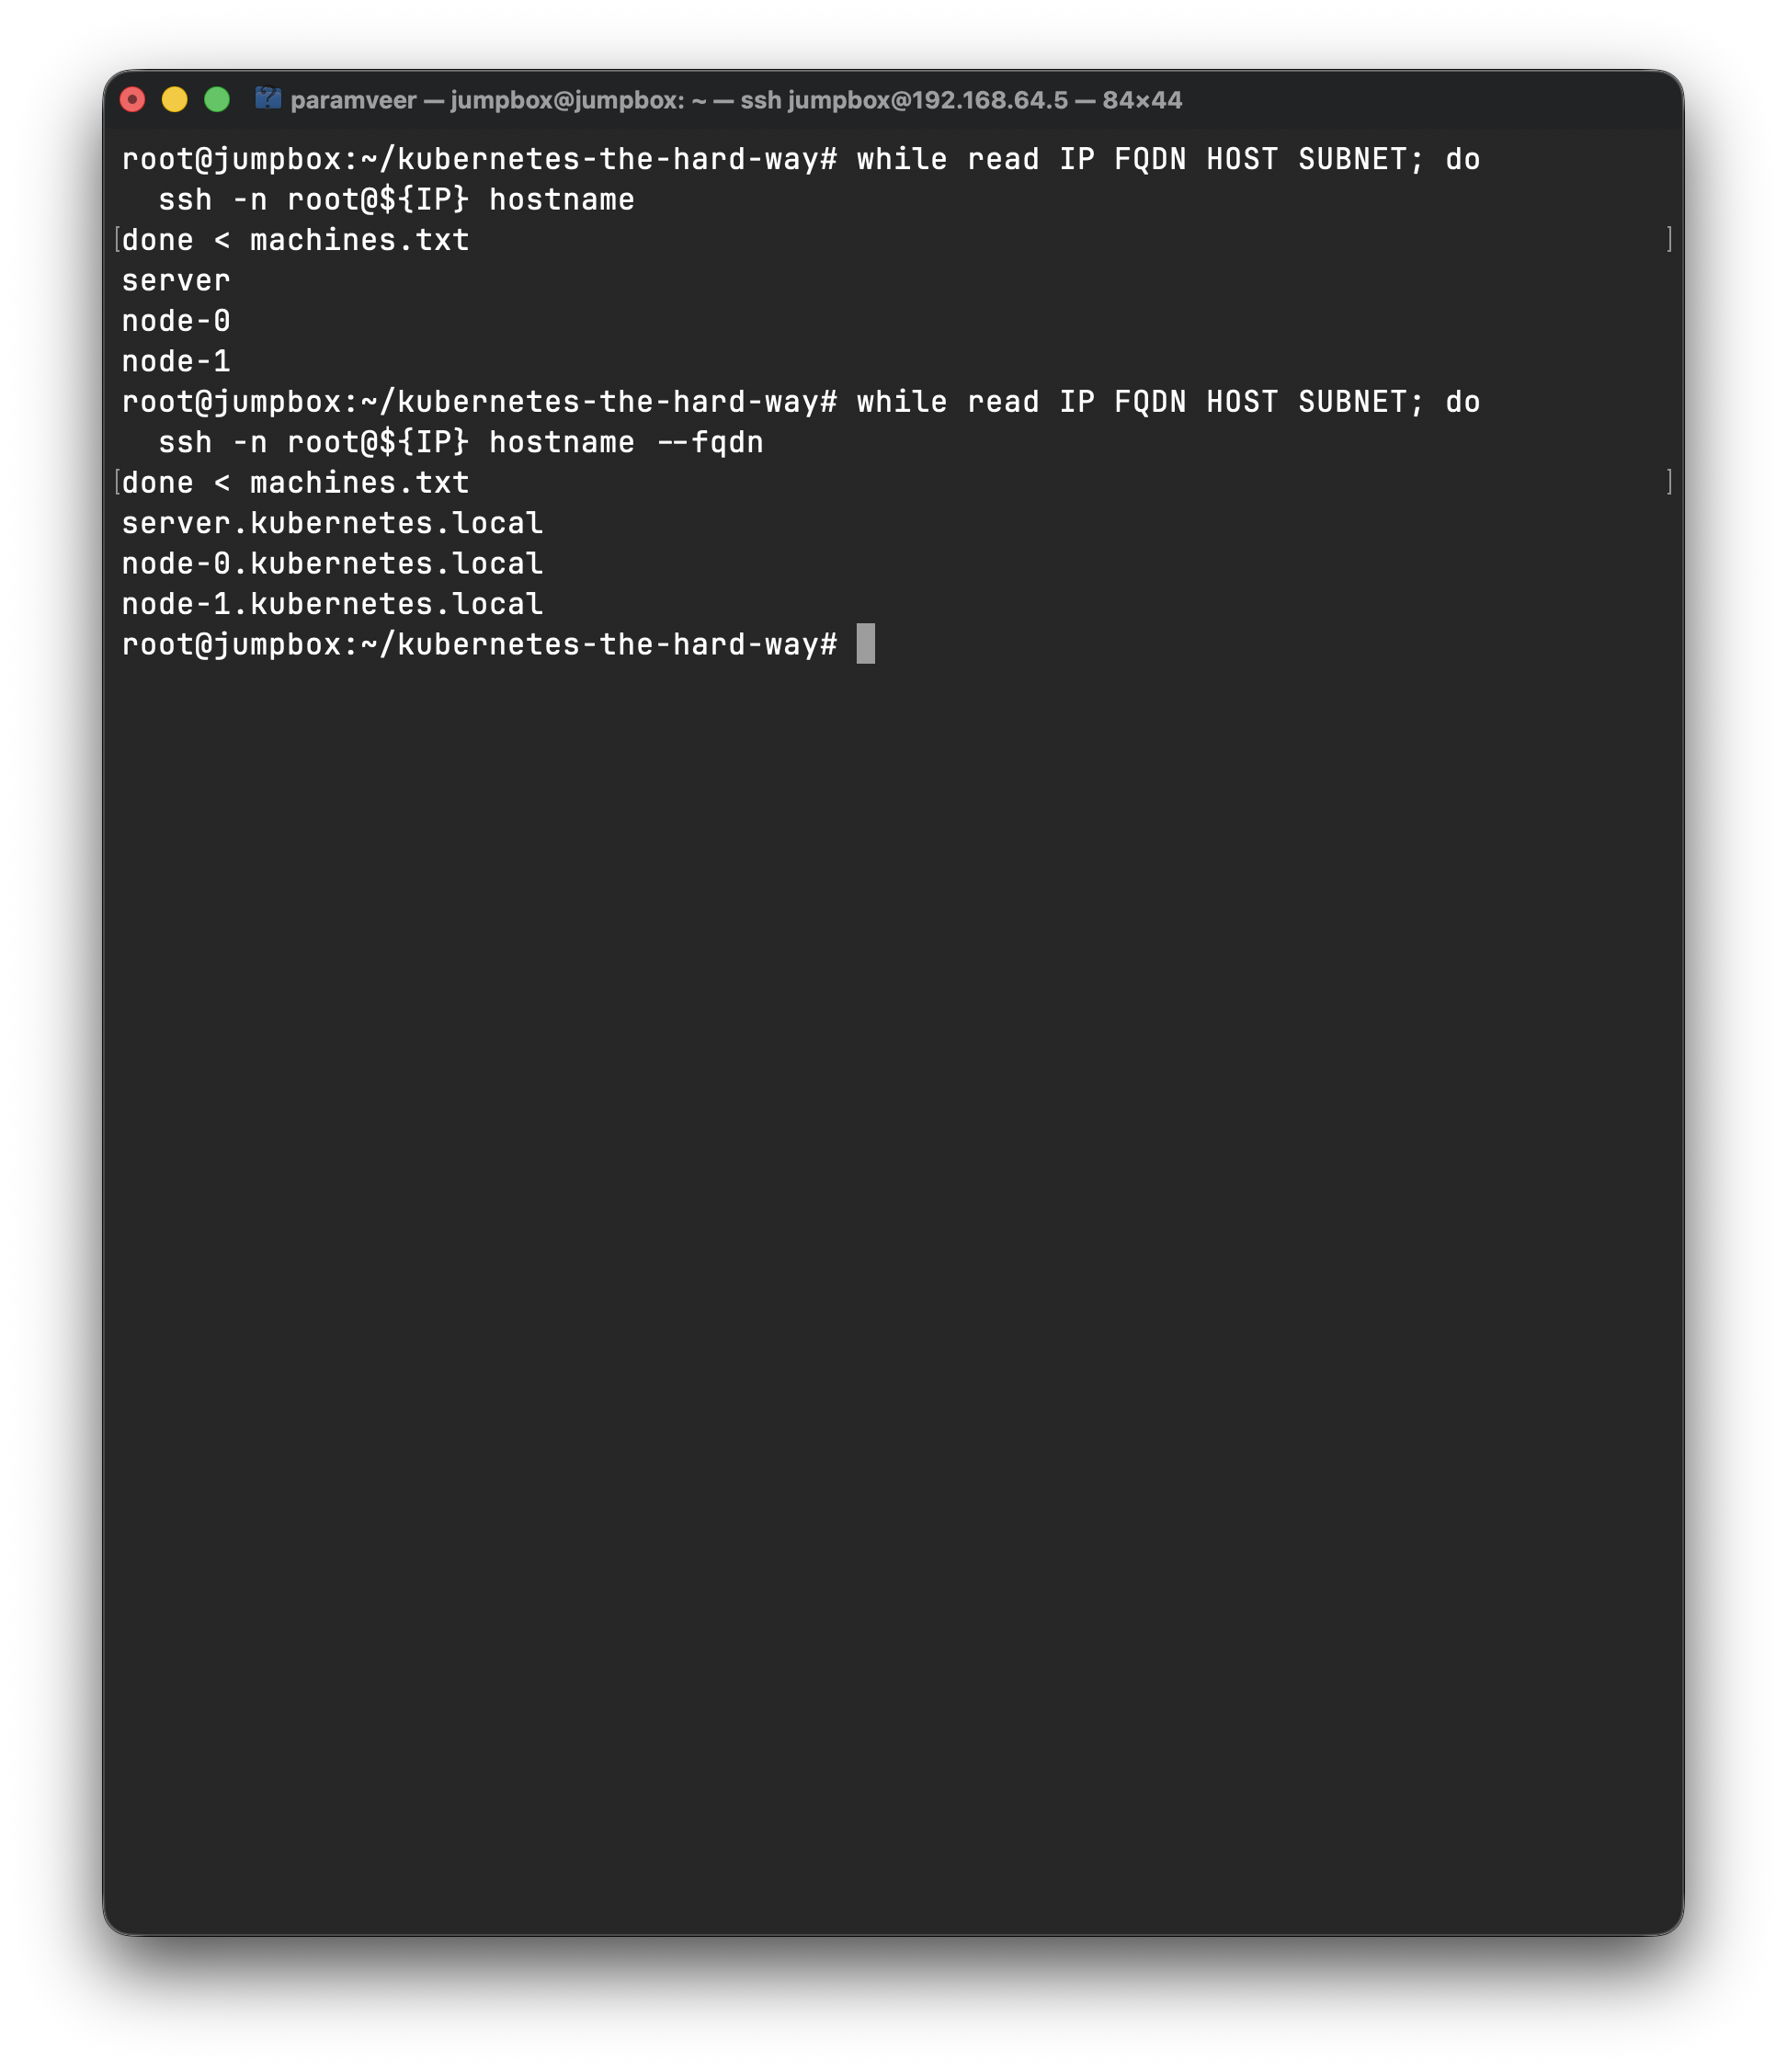
while read IP FQDN HOST SUBNET; dossh -n root@${IP} hostname --fqdndone < machines.txt
It should look something like this
If you are left behind, feel free to go to previous sections to cover this, or go to this section in this course which covers the same topic.
## Hostname lookup table
In this section you will generate a hosts file which will be appended to /etc/hosts file on the jumpbox and to the /etc/hosts files on all three cluster members used for this tutorial. This will allow each machine to be reachable using a hostname such as server, node-0, or node-1.3
TLDR; Don’t need to use ssh root@ip-address to connect
Just ssh machine-name will let us in to the root user for machine-name
Make sure you are in the right machine and dir, specifically this root@jumpbox:~/kubernetes-the-hard-way#
1. Create a new `hosts` file and add a header to identify the machines being added
   ```bash
   echo "" > hosts
   echo "# Kubernetes The Hard Way" >> hosts
Generate a host entry for each machine in the machines.txt file and append it to the hosts file
while read IP FQDN HOST SUBNET; do
     ENTRY="${IP} ${FQDN} ${HOST}"
     echo $ENTRY >> hosts
 done < machines.txt
Review the host entries in the hosts file
cat hosts
Expected output:
# Kubernetes The Hard WayXXX.XXX.XXX.XXX server.kubernetes.local serverXXX.XXX.XXX.XXX node-0.kubernetes.local node-0XXX.XXX.XXX.XXX node-1.kubernetes.local node-1
Adding /etc/hosts Entries To A Local Machine
In this section you will append the DNS entries from the hosts file to the local /etc/hosts file on your jumpbox machine.3
Append the DNS entries from hosts to /etc/hosts
cat hosts >> /etc/hosts
Verify that the /etc/hosts file has been updated
cat /etc/hosts
At this point you should be able to SSH to each machine listed in the machines.txt file using a hostname.3
Verify the same using this command
# should print server, node-0, node-1for host in server node-0 node-1 do ssh root@${host} hostnamedone
Adding /etc/hosts Entries To The Remote Machines
In this section you will append the host entries from hosts to /etc/hosts on each machine listed in the machines.txt text file.3
Copy the hosts file to each machine and append the contents to /etc/hosts
while read IP FQDN HOST SUBNET; do scp hosts root@${HOST}:~/ ssh -n \ root@${HOST} "cat hosts >> /etc/hosts"done < machines.txt
At this point, hostnames can be used when connecting to machines from your jumpbox machine, or any of the three machines in the Kubernetes cluster. Instead of using IP addresses you can now connect to machines using a hostname such as server, node-0, or node-1.3
 Repeat all these steps for